
Gatsby.js Tutorial Part Four
Welcome to Part Four of the tutorial! Halfway through! Hope things are starting to feel pretty comfortable 😀
But don’t get too comfortable 😉. In this tutorial, we’re headed to new territory which will require some brain stretching to fully understand. In the next two parts of the tutorial, we’ll be diving into the Gatsby data layer, which is a powerful feature of Gatsby that lets you easily build sites from Markdown, WordPress, headless CMSs, and other data sources of all flavors.
NOTE: Gatsby’s data layer is powered by GraphQL. If you’re new to GraphQL, this section may feel a little overwhelming. For an in-depth tutorial on GraphQL, we recommend How to GraphQL.
Recap of first half of the tutorial
So far, we’ve been learning how to use React.js—how powerful it is to be able to create our own components to act as custom building blocks for websites.
We’ve also explored styling components using CSS Modules and CSS-in-JS, which lets us encapsulate CSS within our components.
Data in Gatsby
A website has four parts, HTML, CSS, JS, and data. The first half of the tutorial focused on the first three. Let’s learn now how to use data in Gatsby sites.
What is data?
A very computer science-y answer would be: data is things like "strings",
integers (42), objects ({ pizza: true }), etc.
For the purpose of working in Gatsby, however, a more useful answer is “everything that lives outside a React component”.
So far, we’ve been writing text and adding images directly in components. Which is an excellent way to build many websites. But, often you want to store data outside components and then bring the data into the component as needed.
For example, if you’re building a site with WordPress (so other contributors have a nice interface for adding & maintaining content) and Gatsby, the data for the site (pages and posts) are in WordPress and you pull that data, as needed, into your components.
Data can also live in file types like Markdown, CSV, etc. as well as databases and APIs of all sorts.
Gatsby’s data layer lets us pull data from these (and any other source) directly into our components—in the shape and form we want.
How Gatsby’s data layer uses GraphQL to pull data into components
If you’re familiar with the React world, there are many options for loading data into components. One of the most popular and robust of these is a technology called GraphQL.
GraphQL was invented at Facebook to help product engineers pull needed data into components.
GraphQL is a query language (the QL part of its name). If you’re familiar with SQL, it works in a very similar way. Using a special syntax, you describe the data you want in your component and then that data is given to you.
In Gatsby, GraphQL enables components to declare and receive the data they need.
Our first GraphQL query
Let’s create another new site for this part of the tutorial like in the previous parts. We’re going to build a simple Markdown blog called “Pandas Eating Lots”. It’s dedicated to showing off the best pictures & videos of Pandas eating lots of food. Along the way we’ll be dipping our toes into GraphQL and Gatsby’s Markdown support.
Run this command in a new terminal window:
gatsby new tutorial-part-four https://github.com/gatsbyjs/gatsby-starter-hello-worldThen install some other needed dependencies at the root of the project. We’ll use the Typography theme Kirkham + we’ll try out a CSS-in-JS library Glamorous:
npm install --save gatsby-plugin-typography gatsby-plugin-glamor glamorous typography-theme-kirkhamLet’s set up a site similar to what we ended with in Part Three. This site will have a layout component and two page components:
src/pages/index.js
import React from "react";

export default () => (
  <div>
    <h1>Amazing Pandas Eating Things</h1>
    <div>
      <img
        src="https://2.bp.blogspot.com/-BMP2l6Hwvp4/TiAxeGx4CTI/AAAAAAAAD_M/XlC_mY3SoEw/s1600/panda-group-eating-bamboo.jpg"
        alt="Group of pandas eating bamboo"
      />
    </div>
  </div>
);
src/pages/about.js
import React from "react";

export default () => (
  <div>
    <h1>About Pandas Eating Lots</h1>
    <p>
      We're the only site running on your computer dedicated to showing the best
      photos and videos of pandas eating lots of food.
    </p>
  </div>
);
src/layouts/index.js
import React from "react";
import g from "glamorous";
import { css } from "glamor";
import Link from "gatsby-link";

import { rhythm } from "../utils/typography";

const linkStyle = css({ float: `right` });

export default ({ children }) => (
  <g.Div
    margin={`0 auto`}
    maxWidth={700}
    padding={rhythm(2)}
    paddingTop={rhythm(1.5)}
  >
    <Link to={`/`}>
      <g.H3
        marginBottom={rhythm(2)}
        display={`inline-block`}
        fontStyle={`normal`}
      >
        Pandas Eating Lots
      </g.H3>
    </Link>
    <Link className={linkStyle} to={`/about/`}>
      About
    </Link>
    {children()}
  </g.Div>
);
src/utils/typography.js
import Typography from "typography";
import kirkhamTheme from "typography-theme-kirkham";

const typography = new Typography(kirkhamTheme);

export default typography;
gatsby-config.js (must be in the root of your project, not under src)
module.exports = {
  plugins: [
    `gatsby-plugin-glamor`,
    {
      resolve: `gatsby-plugin-typography`,
      options: {
        pathToConfigModule: `src/utils/typography`,
      },
    },
  ],
};
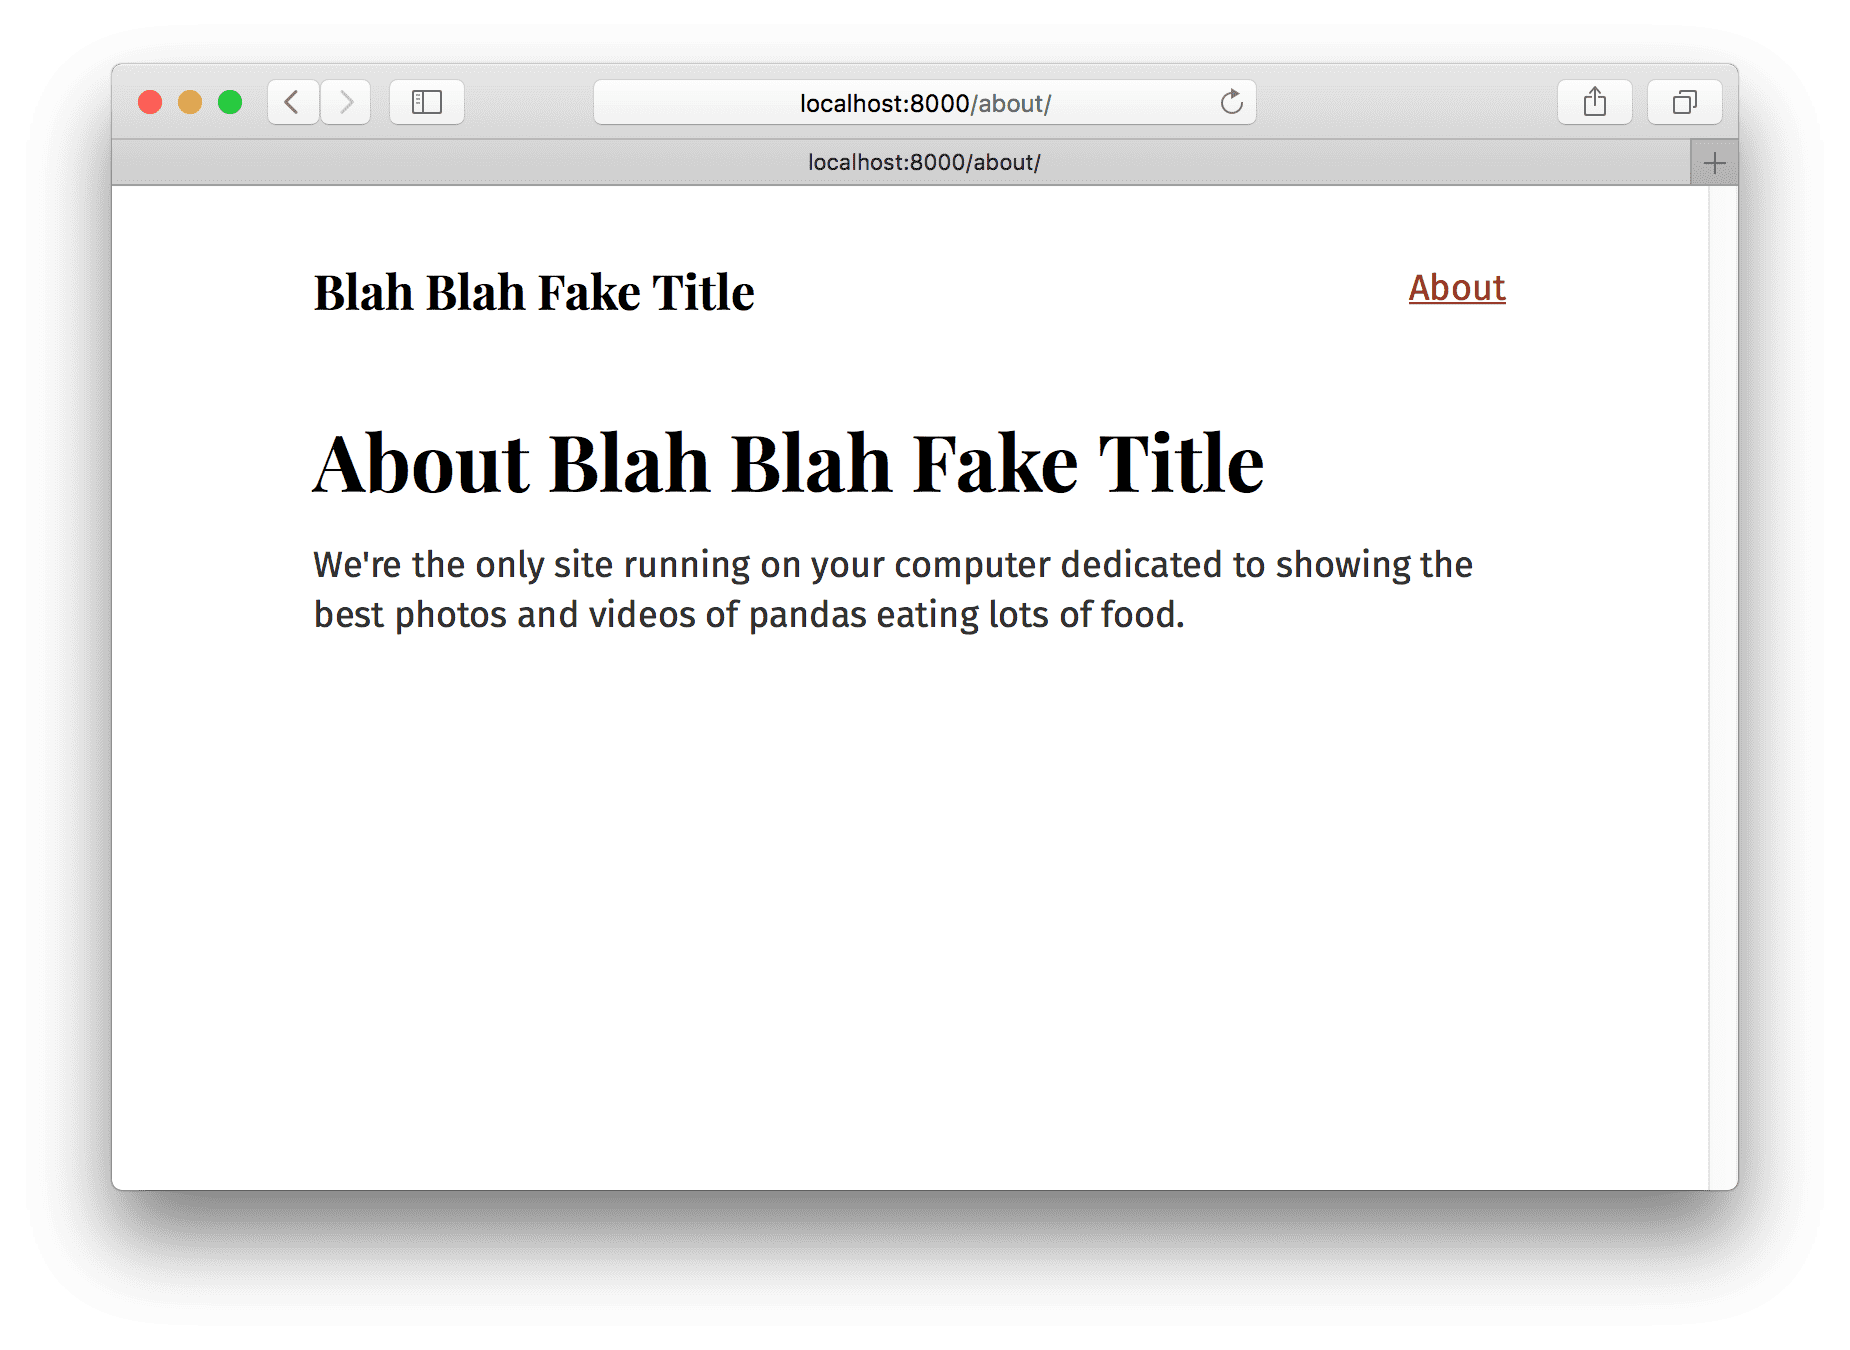
Add the above files and then run gatsby develop like normal and you should see
the following:

We have another simple site with a layout and two pages.
Now let’s start querying 😋
When building sites, it’s common to want to reuse common bits of data across the
site. Like the site title for example. Look at the /about/ page. You’ll
notice that we have the site title in both the layout component (the site
header) as well as in the title of the About page. But what if we want to change
the site title at some point in the future? We’d have to search across all our
components for spots using the site title and edit each instance of the title. This process is both cumbersome and
error-prone, especially as sites get larger and more complex. It’s much better to
store the title in one place and then pull that title into components whenever
we need it.
To solve this, Gatsby supports a simple pattern for adding site “metadata”—like the title.
We add this data to the gatsby-config.js file. Let’s add our site title to
gatsby-config.js file and then query it from our layout and about page!
Edit your gatsby-config.js:
module.exports = {
  siteMetadata: {
    title: `Blah Blah Fake Title`,
  },
  plugins: [
    `gatsby-plugin-glamor`,
    {
      resolve: `gatsby-plugin-typography`,
      options: {
        pathToConfigModule: `src/utils/typography`,
      },
    },
  ],
}
Restart the development server.
Then edit the two components:
src/pages/about.js
import React from "react";

export default ({ data }) =>
  <div>
    <h1>
      About {data.site.siteMetadata.title}
    </h1>
    <p>
      We're the only site running on your computer dedicated to showing the best
      photos and videos of pandas eating lots of food.
    </p>
  </div>

export const query = graphql`
  query AboutQuery {
    site {
      siteMetadata {
        title
      }
    }
  }
`
src/layouts/index.js
import React from "react";
import g from "glamorous";
import { css } from "glamor";
import Link from "gatsby-link";

import { rhythm } from "../utils/typography";

const linkStyle = css({ float: `right` })

export default ({ children, data }) =>
  <g.Div
    margin={`0 auto`}
    maxWidth={700}
    padding={rhythm(2)}
    paddingTop={rhythm(1.5)}
  >
    <Link to={`/`}>
      <g.H3 marginBottom={rhythm(2)} display={`inline-block`}>
        {data.site.siteMetadata.title}
      </g.H3>
    </Link>
    <Link className={linkStyle} to={`/about/`}>
      About
    </Link>
    {children()}
  </g.Div>

export const query = graphql`
  query LayoutQuery {
    site {
      siteMetadata {
        title
      }
    }
  }
`
It worked!! 🎉
But let’s restore the real title.
One of the core principles of Gatsby is creators need an immediate connection to what they’re creating (hat tip to Bret Victor). Or, in other words, when you make any change to code you should immediately see the effect of that change. You manipulate an input of Gatsby and you see the new output showing up on the screen.
So almost everywhere, changes you make will immediately take effect.
Try editing the title in siteMetadata—change the title back to “Pandas Eating
Lots”. The change should show up very quickly in your browser.
Wait — where did the graphql tag come from?
You may have noticed that we used a
tag function
called graphql, but we never actually import a graphql tag. So… how does
this not throw an error?
The short answer is this: during the Gatsby build process, GraphQL queries are pulled out of the original source for parsing.
The longer answer is a little more involved: Gatsby borrows a technique from
Relay that converts our source code into an
abstract syntax tree (AST)
during the build step. All graphql-tagged templates are found in
file-parser.js
and
query-compiler.js,
which effectively removes them from the original source code. This means that
the graphql tag isn’t executed the way that we might expect, which is why
there’s no error, despite the fact that we’re technically using an undefined tag
in our source.
Introducing GraphiQL
GraphiQL is the GraphQL integrated development environment (IDE). It’s a powerful (and all-around awesome) tool you’ll use often while building Gatsby websites.
You can access it when your site’s development server is running—normally at http://localhost:8000/___graphql.
Here we poke around the built-in Site “type” and see what fields are available
on it—including the siteMetadata object we queried earlier. Try opening
GraphiQL and play with your data! Press Ctrl + Space to bring up
the autocomplete window and Ctrl + Enter to run the query. We’ll be
using GraphiQL a lot more through the remainder of the tutorial.
Source plugins
Data in Gatsby sites can come literally from anywhere: APIs, databases, CMSs, local files, etc.
Source plugins fetch data from their source. E.g. the filesystem source plugin knows how to fetch data from the file system. The WordPress plugin knows how to fetch data from the WordPress API.
Let’s add gatsby-source-filesystem and
explore how it works.
First install the plugin at the root of the project:
npm install --save gatsby-source-filesystemThen add it to your gatsby-config.js:
module.exports = {
  siteMetadata: {
    title: `Pandas Eating Lots`,
  },
  plugins: [
    {
      resolve: `gatsby-source-filesystem`,
      options: {
        name: `src`,
        path: `${__dirname}/src/`,
      },
    },
    `gatsby-plugin-glamor`,
    {
      resolve: `gatsby-plugin-typography`,
      options: {
        pathToConfigModule: `src/utils/typography`,
      },
    },
  ],
}
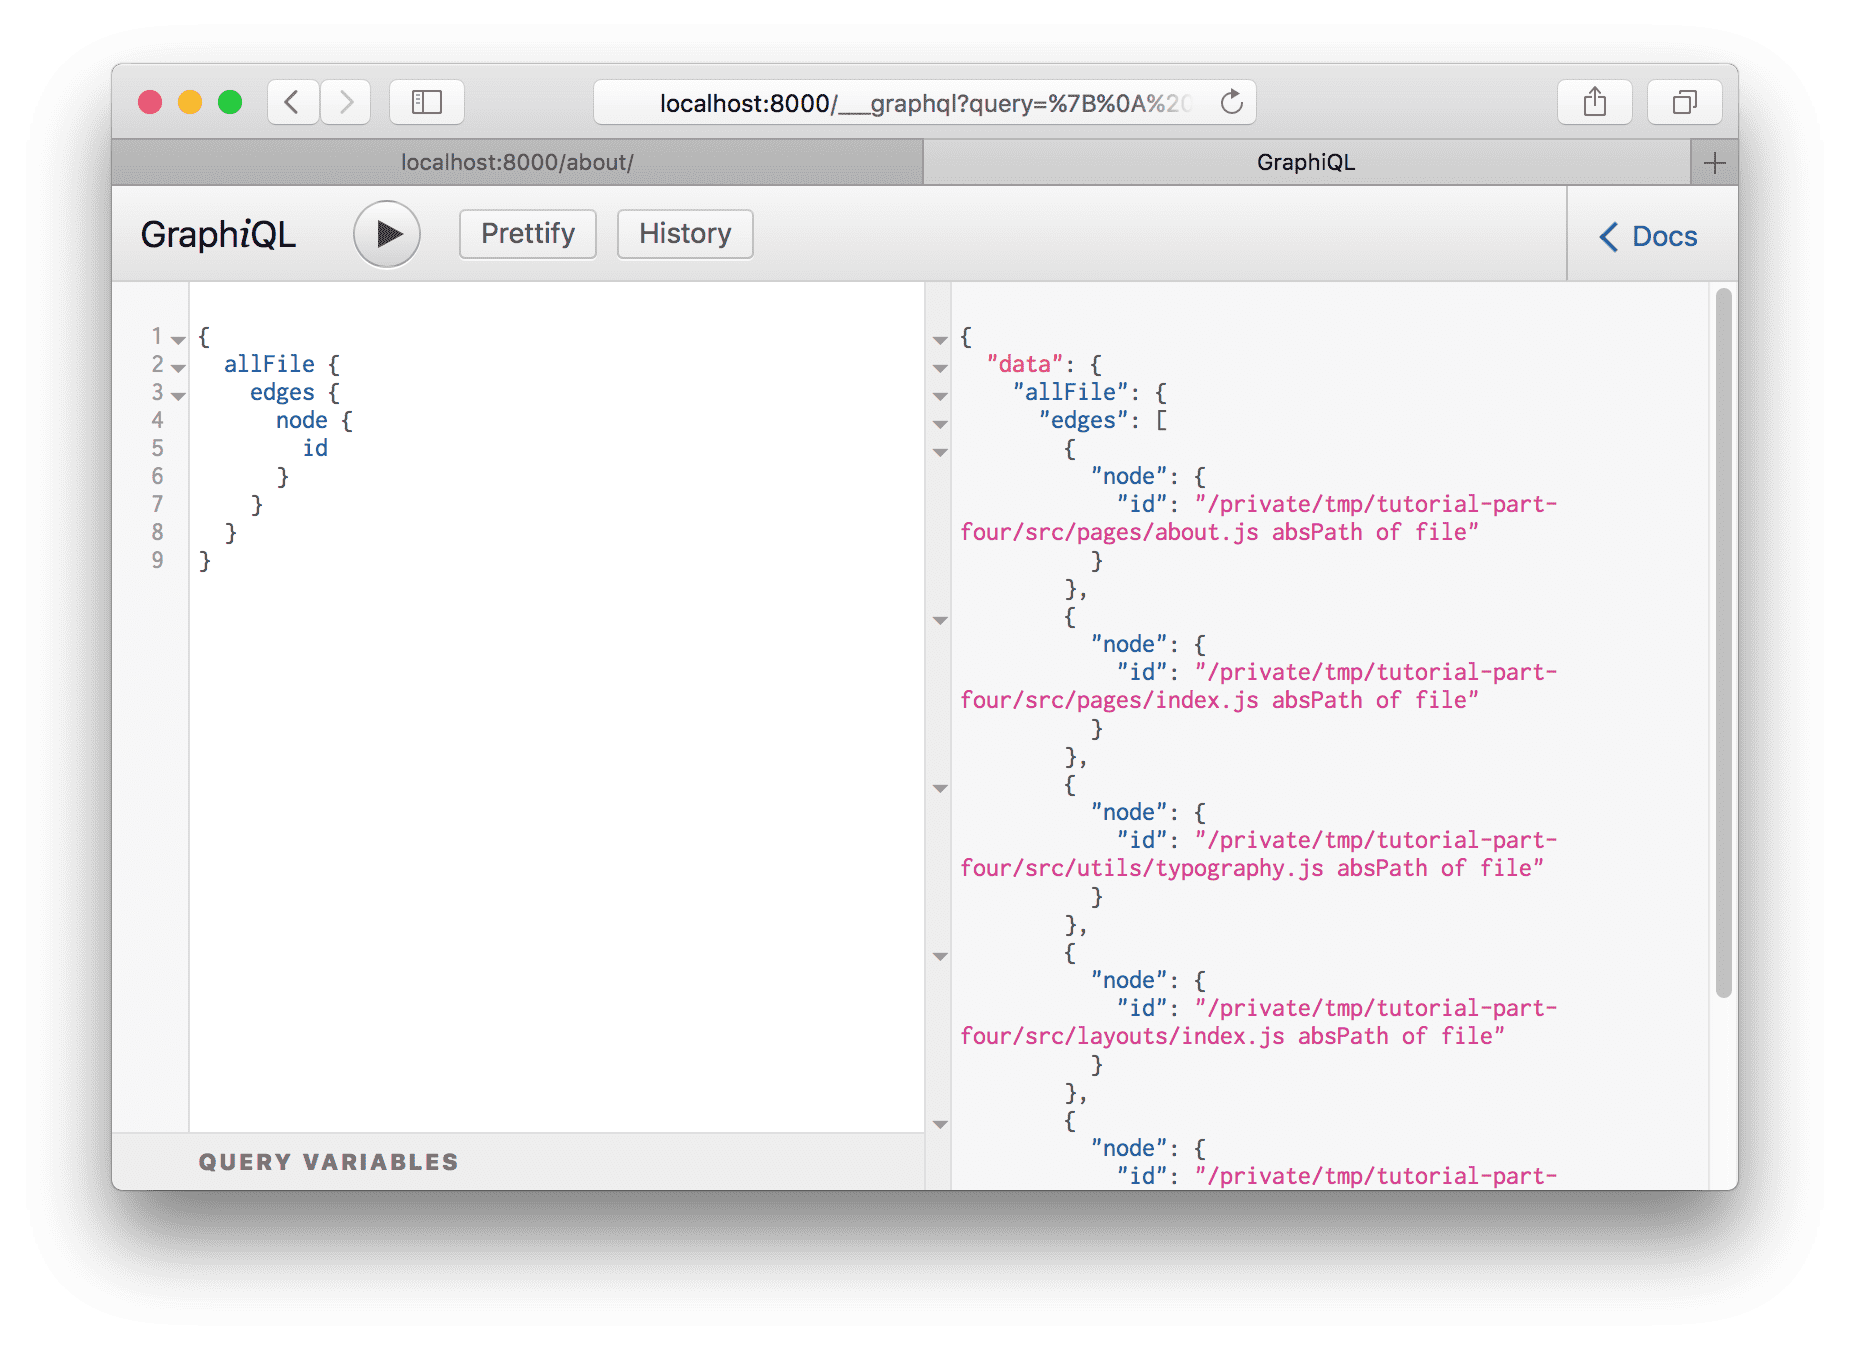
Save that and restart the gatsby development server. Then open up GraphiQL again.
If you bring up the autocomplete window you’ll see:

Hit Enter on allFile then type Ctrl + Enter to run a
query.
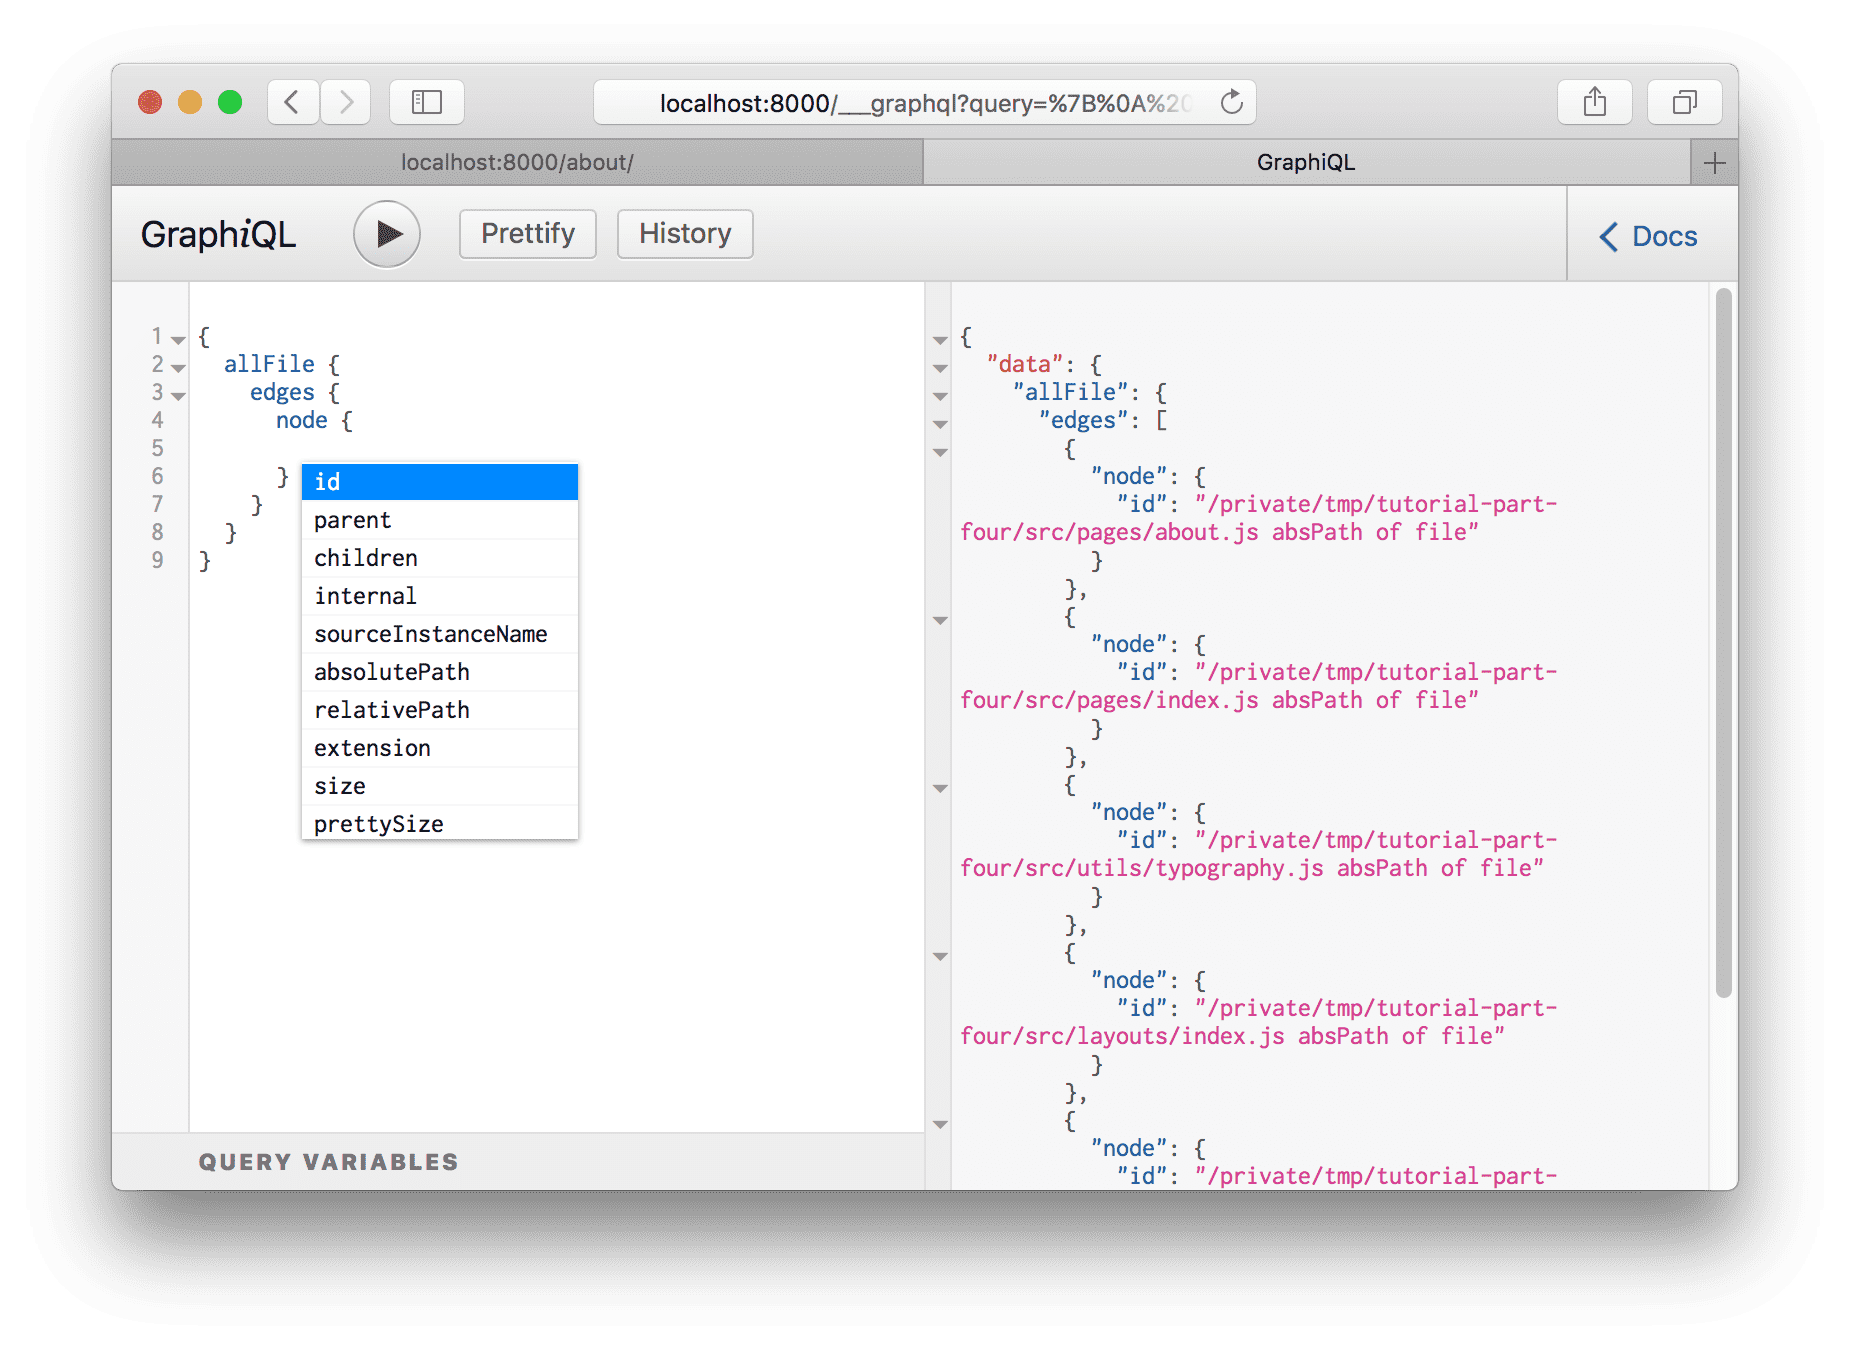
Delete the id from the query and bring up the autocomplete again (Ctrl +
Space).
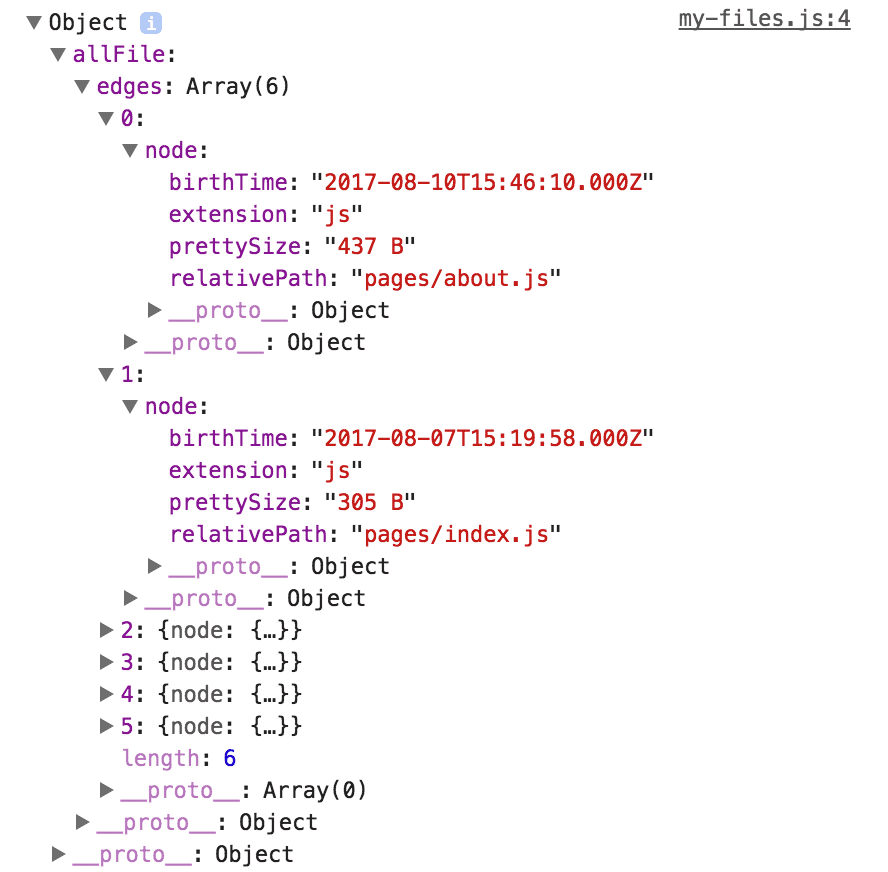
Try adding a number of fields to your query, pressing Ctrl + Enter each time to re-run the query. You’ll see something like this:
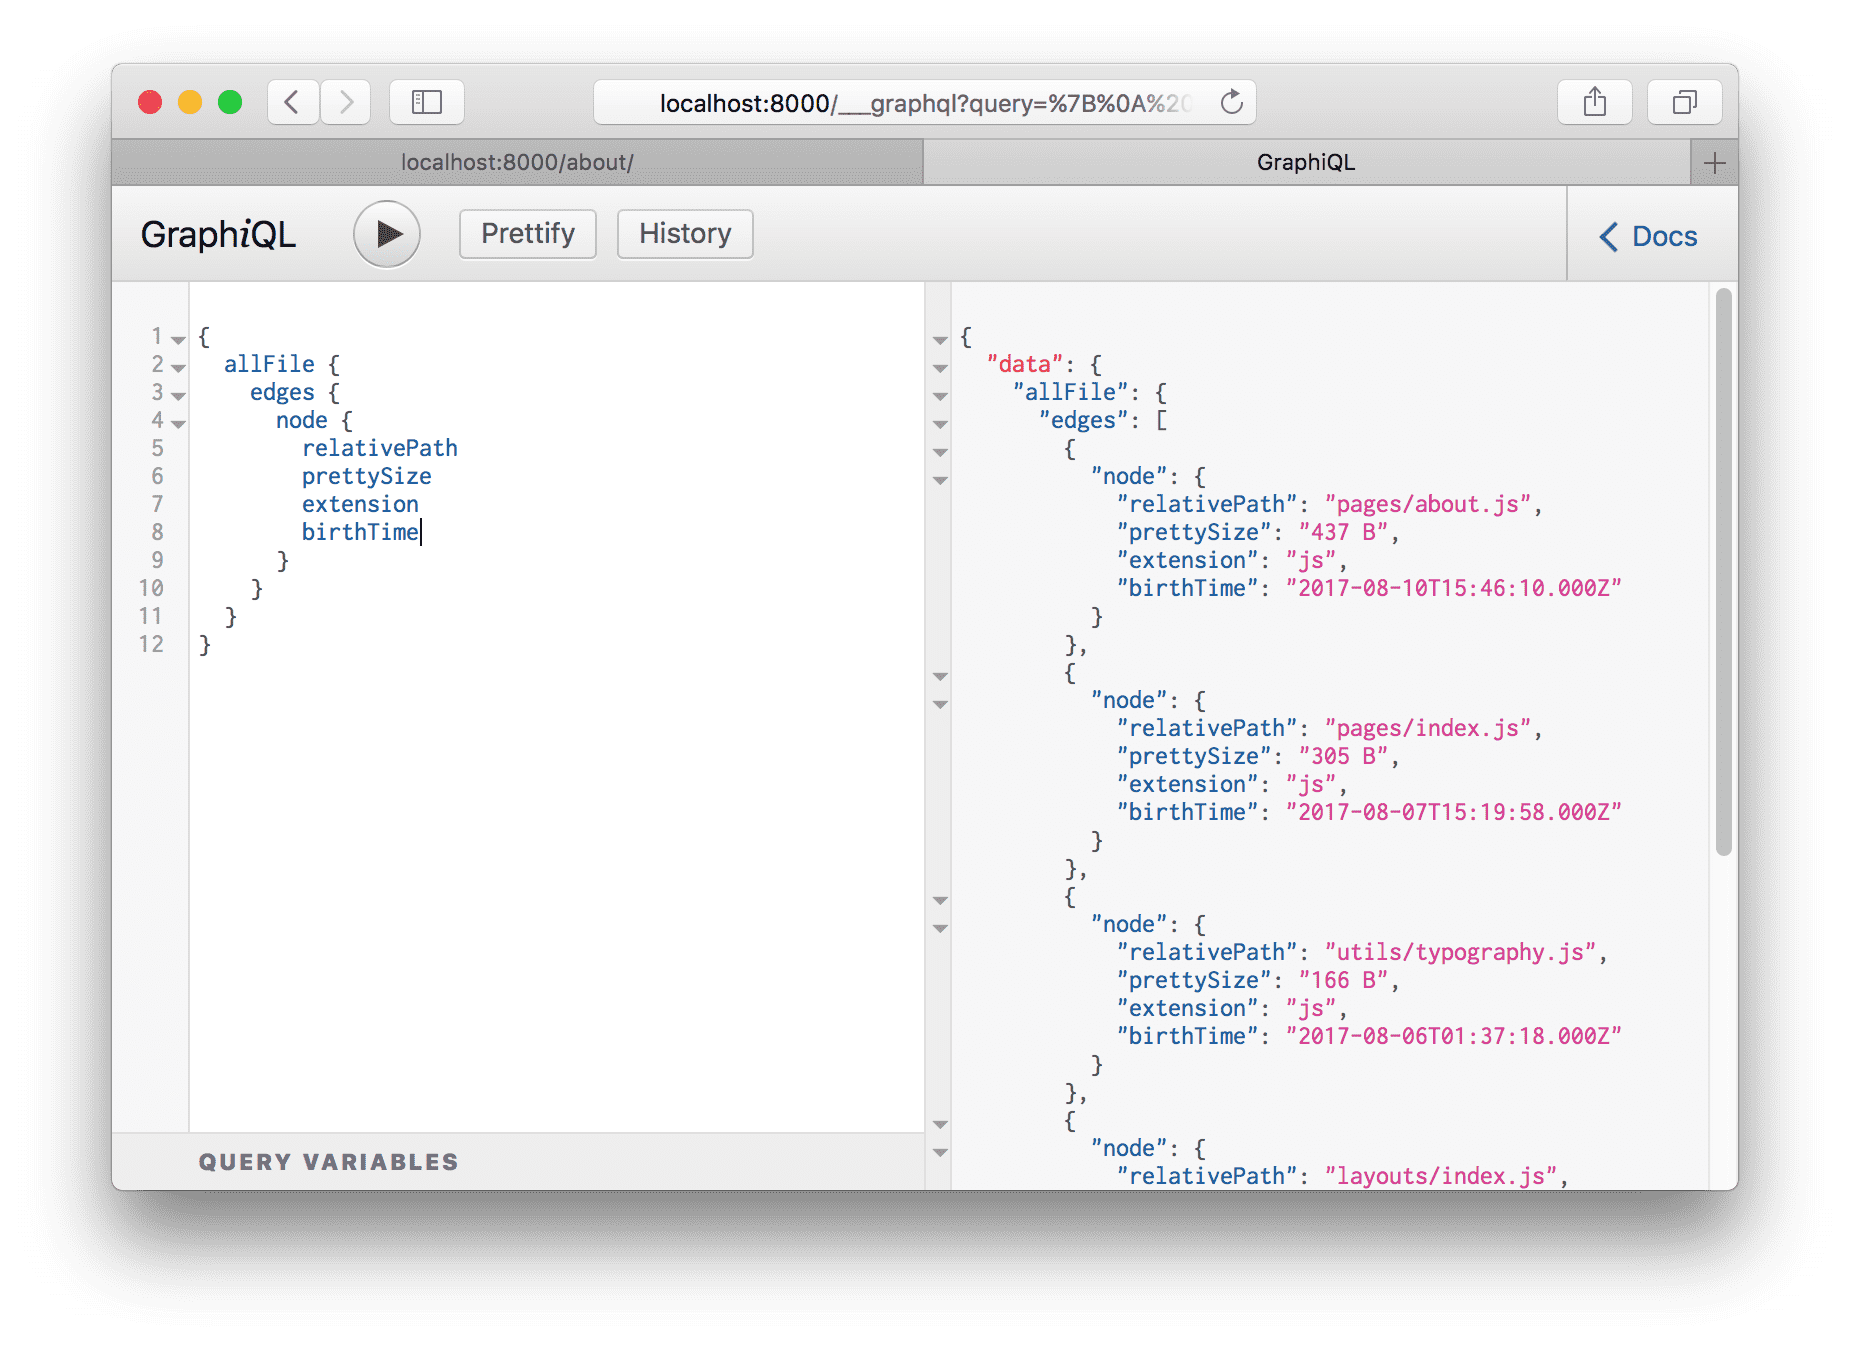
The result is an array of File “nodes” (node is a fancy name for an object in a “graph”). Each File object has the fields we queried for.
Build a page with a GraphQL query
Building new pages with Gatsby often starts in GraphiQL. You first sketch out the data query by playing in GraphiQL then copy this to a React page component to start building the UI.
Let’s try this.
Create a new file at src/pages/my-files.js with the allFile query we just
created:
import React from "react"

export default ({ data }) => {
  console.log(data)
  return <div>Hello world</div>
}

export const query = graphql`
  query MyFilesQuery {
    allFile {
      edges {
        node {
          relativePath
          prettySize
          extension
          birthTime(fromNow: true)
        }
      }
    }
  }
`
The console.log(data) line is highlighted above. It’s often helpful when
creating a new component to console out the data you’re getting from the query
so you can explore the data in your browser console while building the UI.
If you visit the new page at /my-files/ and open up your browser console you
will see:
The shape of the data matches the shape of the query.
Let’s add some code to our component to print out the File data.
import React from "react"

export default ({ data }) => {
  console.log(data)
  return (
    <div>
      <h1>My Site's Files</h1>
      <table>
        <thead>
          <tr>
            <th>relativePath</th>
            <th>prettySize</th>
            <th>extension</th>
            <th>birthTime</th>
          </tr>
        </thead>
        <tbody>
          {data.allFile.edges.map(({ node }, index) =>
            <tr key={index}>
              <td>
                {node.relativePath}
              </td>
              <td>
                {node.prettySize}
              </td>
              <td>
                {node.extension}
              </td>
              <td>
                {node.birthTime}
              </td>
            </tr>
          )}
        </tbody>
      </table>
    </div>
  )
}

export const query = graphql`
  query MyFilesQuery {
    allFile {
      edges {
        node {
          relativePath
          prettySize
          extension
          birthTime(fromNow: true)
        }
      }
    }
  }
`
And… 😲

Transformer plugins
Often, the format of the data we get from source plugins isn’t what you want to use to build your website. The filesystem source plugin lets you query data about files but what if you want to query data inside files?
To make this possible, Gatsby supports transformer plugins which take raw content from source plugins and transform it into something more usable.
For example, Markdown files. Markdown is nice to write in but when you build a page with it, you need the Markdown to be HTML.
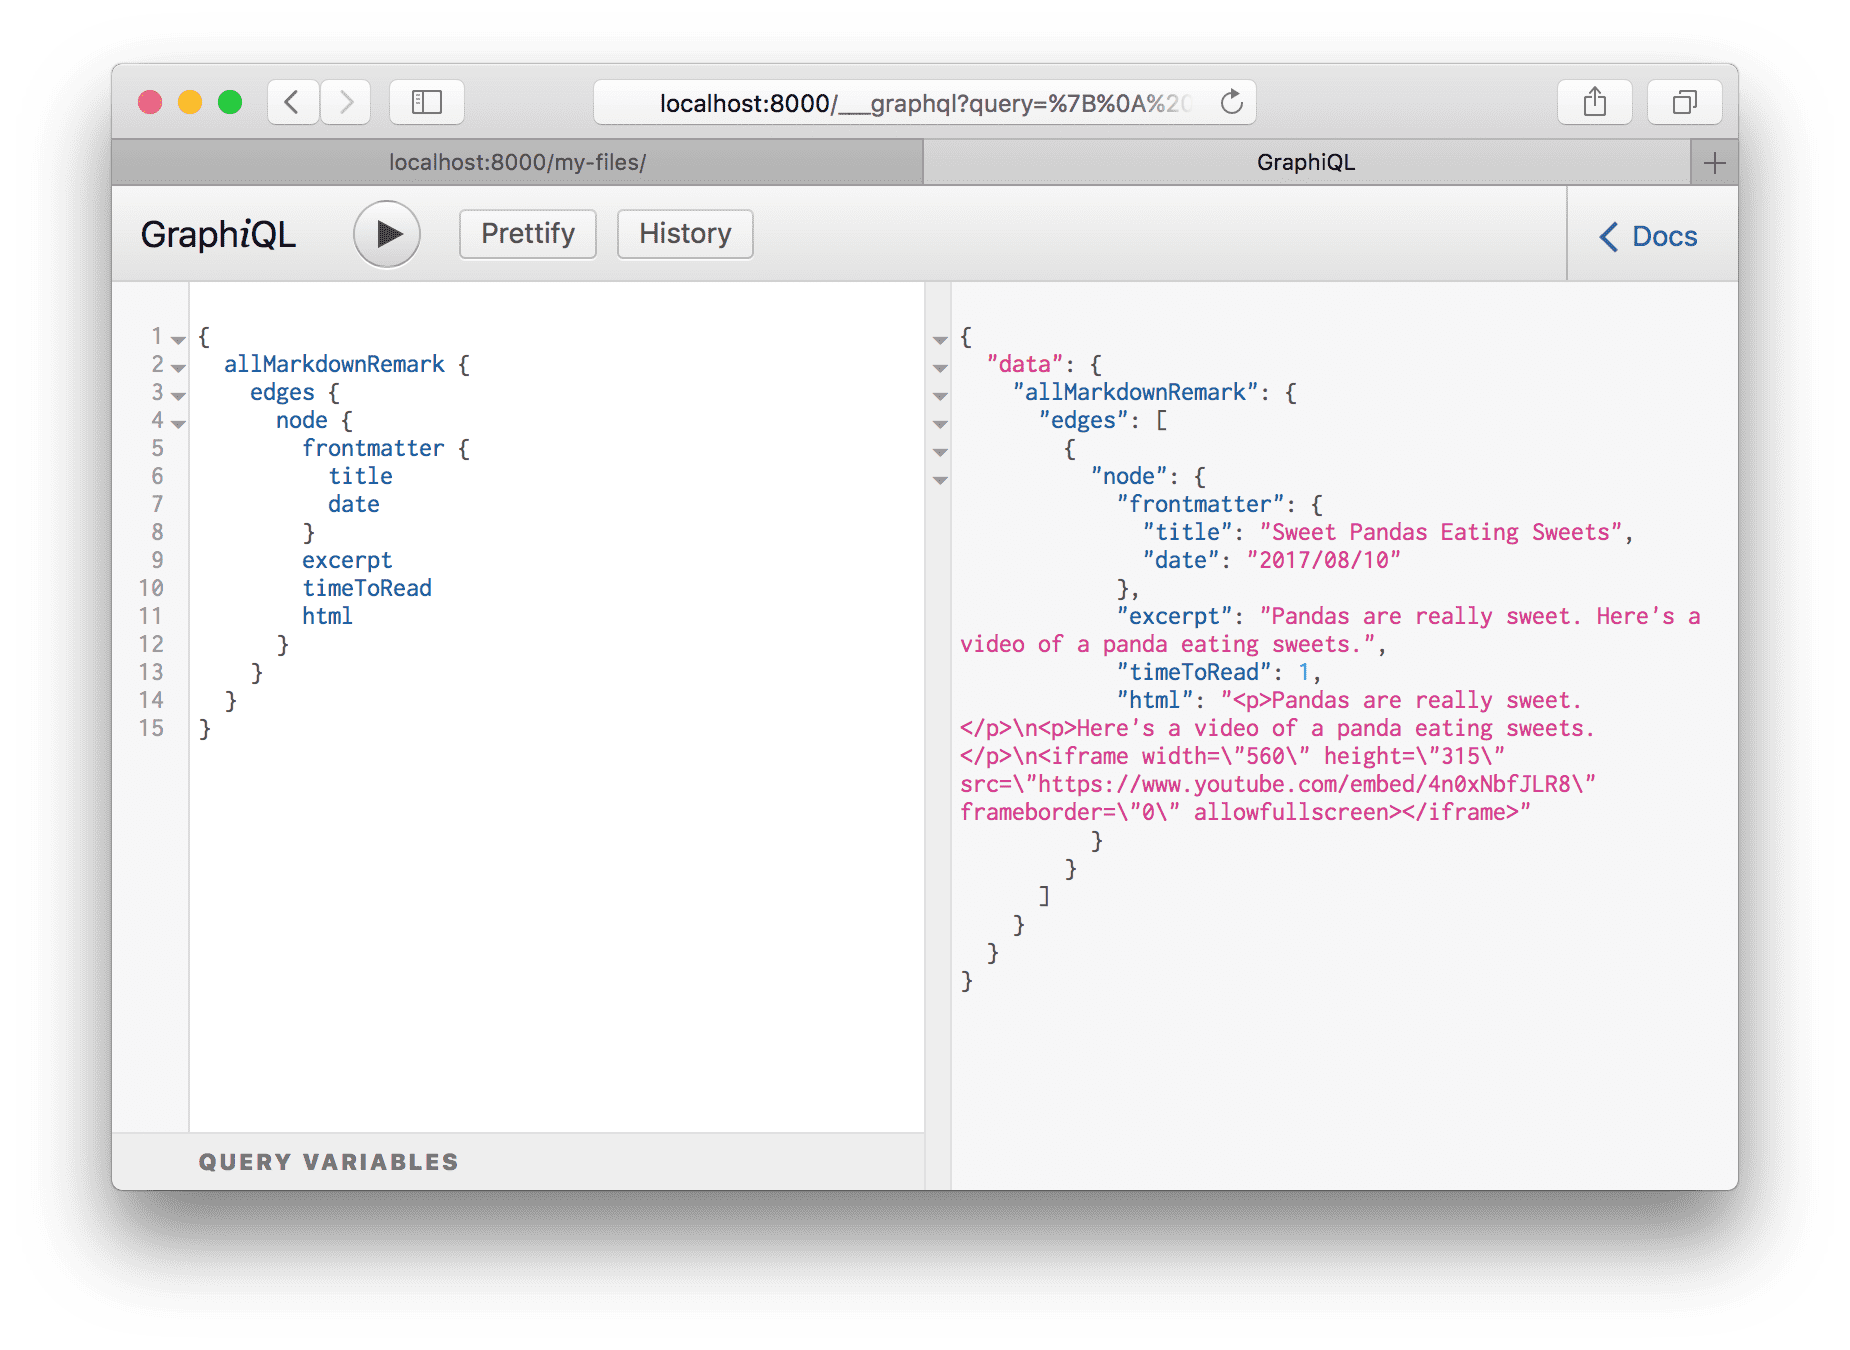
Let’s add a Markdown file to our site at
src/pages/sweet-pandas-eating-sweets.md (This will become our first Markdown
blog post) and learn how to transform it to HTML using transformer plugins and
GraphQL.
---
title: "Sweet Pandas Eating Sweets"
date: "2017-08-10"
---

Pandas are really sweet.

Here's a video of a panda eating sweets.

<iframe width="560" height="315" src="https://www.youtube.com/embed/4n0xNbfJLR8" frameborder="0" allowfullscreen></iframe>
Once you save the file, look at /my-files/ again—the new Markdown file is in
the table. This is a very powerful feature of Gatsby. Like the earlier
siteMetadata example, source plugins can live reload data.
gatsby-source-filesystem is always scanning for new files to be added and when
they are, re-runs your queries.
Let’s add a transformer plugin that can transform Markdown files:
npm install --save gatsby-transformer-remarkThen add it to the gatsby-config.js like normal:
module.exports = {
  siteMetadata: {
    title: `Pandas Eating Lots`,
  },
  plugins: [
    {
      resolve: `gatsby-source-filesystem`,
      options: {
        name: `src`,
        path: `${__dirname}/src/`,
      },
    },
    `gatsby-transformer-remark`,
    `gatsby-plugin-glamor`,
    {
      resolve: `gatsby-plugin-typography`,
      options: {
        pathToConfigModule: `src/utils/typography`,
      },
    },
  ],
}
Restart the development server then refresh (or open again) GraphiQL and look at the autocomplete:
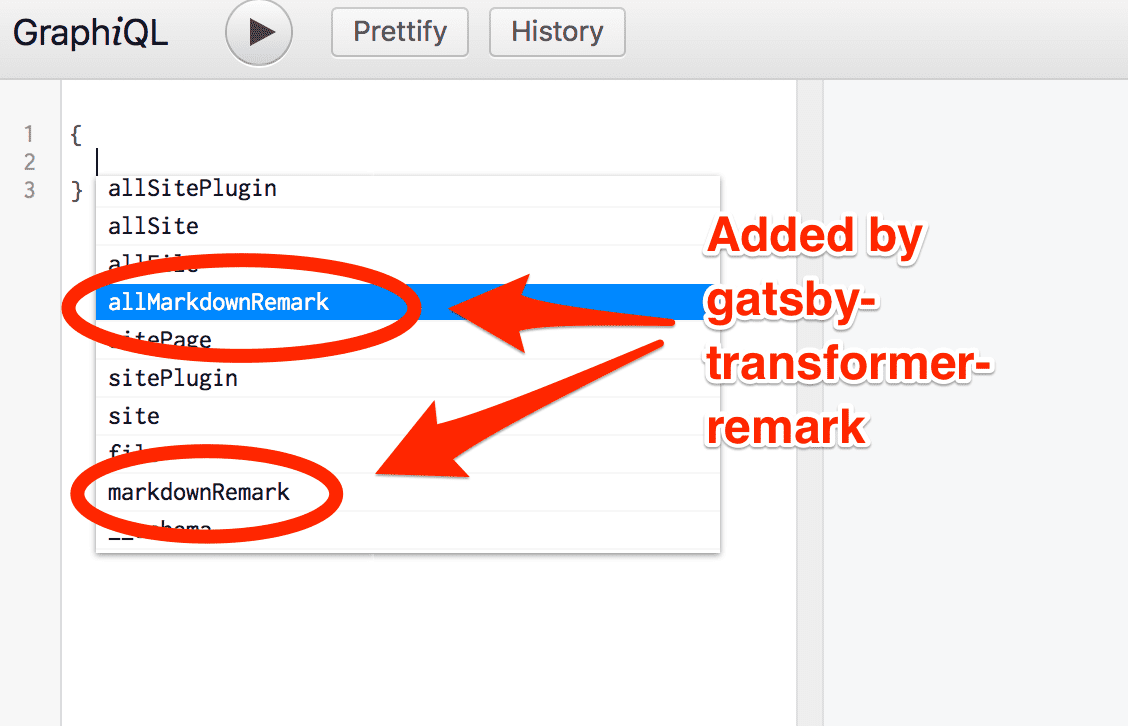
Select allMarkdownRemark again and run it like we did for allFile. You’ll
see there the Markdown file we recently added. Explore the fields that are
available on the MarkdownRemark node.
Ok! Hopefully some basics are starting to fall into place. Source plugins bring data into Gatsby’s data system and transformer plugins transform raw content brought by source plugins. This pattern can handle all data sourcing and data transformation you might need when building a Gatsby site.
Create a list of our site’s Markdown files in src/pages/index.js
Let’s now create a list of our Markdown files on the front page. Like many blogs, we want to end up with a list of links on the front page pointing to each blog post. With GraphQL we can query for the current list of Markdown blog posts so we won’t need to maintain the list manually.
Like with the src/pages/my-files.js page, replace src/pages/index.js with
the following to add a query with some initial HTML and styling.
import React from "react";
import g from "glamorous";

import { rhythm } from "../utils/typography";

export default ({ data }) => {
  console.log(data);
  return (
    <div>
      <g.H1 display={"inline-block"} borderBottom={"1px solid"}>
        Amazing Pandas Eating Things
      </g.H1>
      <h4>{data.allMarkdownRemark.totalCount} Posts</h4>
      {data.allMarkdownRemark.edges.map(({ node }) => (
        <div key={node.id}>
          <g.H3 marginBottom={rhythm(1 / 4)}>
            {node.frontmatter.title}{" "}
            <g.Span color="#BBB">— {node.frontmatter.date}</g.Span>
          </g.H3>
          <p>{node.excerpt}</p>
        </div>
      ))}
    </div>
  );
};

export const query = graphql`
  query IndexQuery {
    allMarkdownRemark {
      totalCount
      edges {
        node {
          id
          frontmatter {
            title
            date(formatString: "DD MMMM, YYYY")
          }
          excerpt
        }
      }
    }
  }
`;
Now the frontpage should look like:

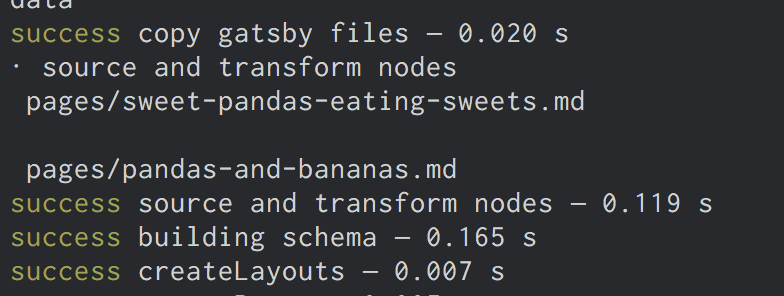
But our one blog post looks a bit lonely. So let’s add another one at
src/pages/pandas-and-bananas.md
---
title: Pandas and Bananas
date: "2017-08-21"
---

Do Pandas eat bananas? Check out this short video that shows that yes! pandas do
seem to really enjoy bananas!

<iframe width="560" height="315" src="https://www.youtube.com/embed/4SZl1r2O_bY" frameborder="0" allowfullscreen></iframe>

Which looks great! Except…the order of the posts is wrong.
But this is easy to fix. When querying a connection of some type, you can pass a
variety of arguments to the query. You can sort and filter nodes, set how
many nodes to skip, and choose the limit of how many nodes to retrieve. With
this powerful set of operators, we can select any data we want—in the format we
need.
In our index page’s query, change allMarkdownRemark to
allMarkdownRemark(sort: {fields: [frontmatter___date], order: DESC}). Save
this and the sort order should be fixed.
Try opening GraphiQL and playing with different sort options. You can sort the
allFile connection along with other connections.
Programmatically creating pages from data
So this is great! We have a nice index page where we’re querying our Markdown files. But we don’t want to just see excerpts, we want actual pages for our Markdown files.
Let’s get started.
So far, we’ve created pages by placing React components in src/pages. We’ll
now learn how to programmatically create pages from data. Gatsby is not
limited to making pages from files like many static site generators. Gatsby lets
you use GraphQL to query your data and map the data to pages—all at build
time. This is a really powerful idea. We’ll be exploring its implications and
ways to use it for the remainder of the tutorial.
Creating new pages has two steps, 1) generate the “path” or “slug” for the page and 2) create the page.
To create our Markdown pages, we’ll learn to use two Gatsby APIs
onCreateNode and
createPages. These are two workhorse APIs
you’ll see used in many sites and plugins.
We do our best to make Gatsby APIs simple to implement. To implement an API, you export a function
with the name of the API from gatsby-node.js.
So let’s do that. In the root of your site, create a file named
gatsby-node.js. Then add to it the following. This function will be called by
Gatsby whenever a new node is created (or updated).
exports.onCreateNode = ({ node }) => {
  console.log(node.internal.type);
};
Stop and restart the development server. As you do, you’ll see quite a few newly created nodes get logged to the terminal console.
Let’s use this API to add the slugs for our Markdown pages to MarkdownRemark
nodes.
Change our function so it now is only looking at MarkdownRemark nodes.
exports.onCreateNode = ({ node }) => {
  if (node.internal.type === `MarkdownRemark`) {
    console.log(node.internal.type)
  }
}
We want to use each Markdown file name to create the page slug. So
pandas-and-bananas.md" will become /pandas-and-bananas/. But how do we get
the file name from the MarkdownRemark node? To get it, we need to traverse
the “node graph” to its parent File node, as File nodes contain data we
need about files on disk. To do that, modify our function again:
exports.onCreateNode = ({ node, getNode }) => {
  if (node.internal.type === `MarkdownRemark`) {
    const fileNode = getNode(node.parent)
    console.log(`\n`, fileNode.relativePath)
  }
}
There in your terminal you should see the relative paths for our two Markdown files.
Now let’s create slugs. As the logic for creating slugs from file names can get
tricky, the gatsby-source-filesystem plugin ships with a function for creating
slugs. Let’s use that.
const { createFilePath } = require(`gatsby-source-filesystem`)

exports.onCreateNode = ({ node, getNode }) => {
  if (node.internal.type === `MarkdownRemark`) {
    console.log(createFilePath({ node, getNode, basePath: `pages` }))
  }
}
The function handles finding the parent File node along with creating the
slug. Run the development server again and you should see logged to the terminal
two slugs, one for each Markdown file.
Now lets add our new slugs directly onto the MarkdownRemark nodes. This is
powerful, as any data we add to nodes is available to query later with GraphQL.
So it’ll be easy to get the slug when it comes time to create the pages.
To do so, we’ll use a function passed to our API implementation called
createNodeField. This function
allows us to create additional fields on nodes created by other plugins. Only
the original creator of a node can directly modify the node—all other plugins
(including our gatsby-node.js) must use this function to create additional
fields.
const { createFilePath } = require(`gatsby-source-filesystem`)

exports.onCreateNode = ({ node, getNode, boundActionCreators }) => {
  const { createNodeField } = boundActionCreators
  if (node.internal.type === `MarkdownRemark`) {
    const slug = createFilePath({ node, getNode, basePath: `pages` })
    createNodeField({
      node,
      name: `slug`,
      value: slug,
    })
  }
}
Restart the development server and open or refresh GraphiQL. Then run this query to see our new slugs.
{
  allMarkdownRemark {
    edges {
      node {
        fields {
          slug
        }
      }
    }
  }
}
Now that the slugs are created, we can create the pages.
In the same gatsby-node.js file, add the following. Here we tell Gatsby about
our pages—what are their paths, what template component do they use, etc.
const { createFilePath } = require(`gatsby-source-filesystem`)
exports.onCreateNode = ({ node, getNode, boundActionCreators }) => {
const { createNodeField } = boundActionCreators
if (node.internal.type === `MarkdownRemark`) {
const slug = createFilePath({ node, getNode, basePath: `pages` })
createNodeField({
node,
name: `slug`,
value: slug,
})
}
}
exports.createPages = ({ graphql, boundActionCreators }) => {
return new Promise((resolve, reject) => {
graphql(`
{
allMarkdownRemark {
edges {
node {
fields {
slug
}
}
}
}
}
`).then(result => {
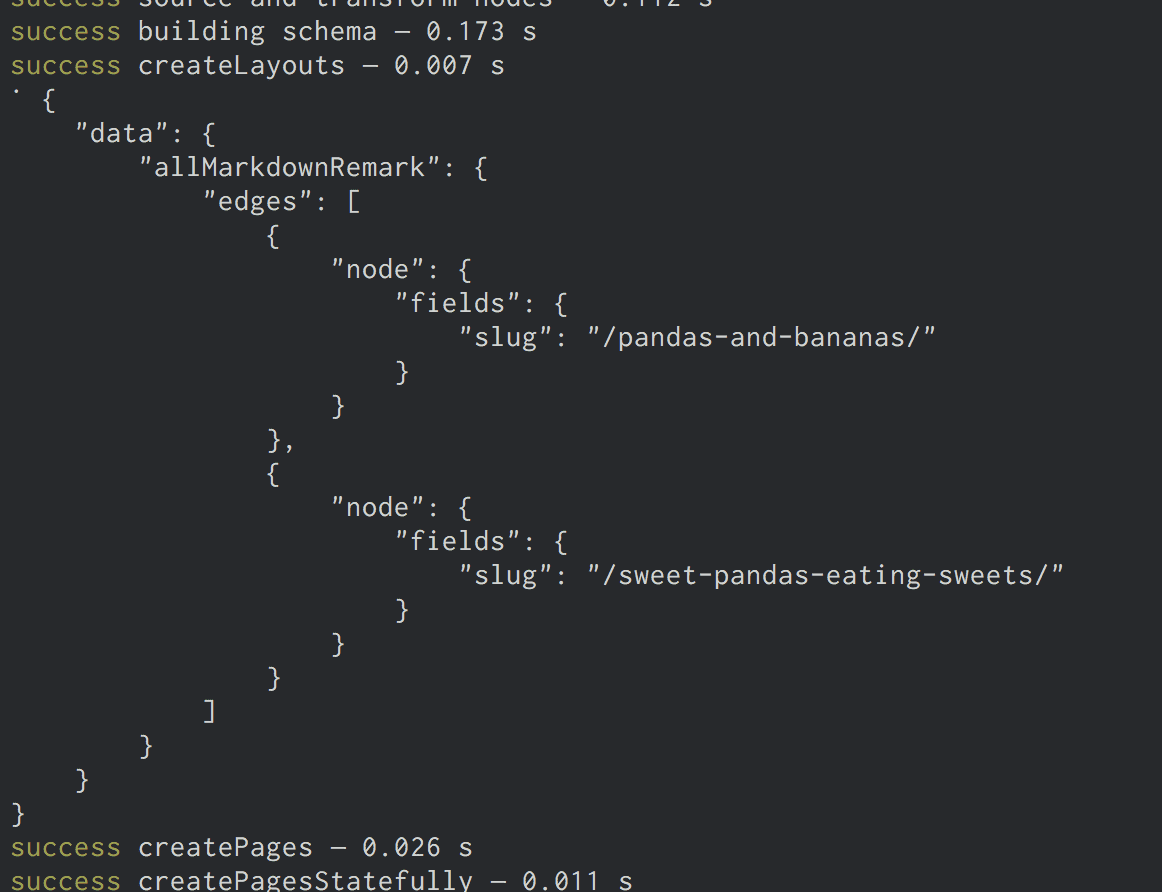
console.log(JSON.stringify(result, null, 4))
resolve()
})
})
}
We’ve added an implementation of the
createPages API which Gatsby calls to add
pages. We’re using the passed in graphql function to query for the Markdown
slugs we just created. Then we’re logging out the result of the query which
should look like:
We need one other thing to create pages: a page template component. Like everything in Gatsby, programmatic pages are powered by React components. When creating a page, we need to specify which component to use.
Create a directory at src/templates and then add the following in a file named
src/templates/blog-post.js.
import React from "react";

export default () => {
  return <div>Hello blog post</div>;
};
Then update gatsby-node.js
const path = require(`path`)
const { createFilePath } = require(`gatsby-source-filesystem`)

exports.onCreateNode = ({ node, getNode, boundActionCreators }) => {
  const { createNodeField } = boundActionCreators
  if (node.internal.type === `MarkdownRemark`) {
    const slug = createFilePath({ node, getNode, basePath: `pages` })
    createNodeField({
      node,
      name: `slug`,
      value: slug,
    })
  }
}

exports.createPages = ({ graphql, boundActionCreators }) => {
  const { createPage } = boundActionCreators
  return new Promise((resolve, reject) => {
    graphql(`
      {
        allMarkdownRemark {
          edges {
            node {
              fields {
                slug
              }
            }
          }
        }
      }
    `).then(result => {
      result.data.allMarkdownRemark.edges.forEach(({ node }) => {
        createPage({
          path: node.fields.slug,
          component: path.resolve(`./src/templates/blog-post.js`),
          context: {
            // Data passed to context is available in page queries as GraphQL variables.
            slug: node.fields.slug,
          },
        })
      })
      resolve()
    })
  })
}
Restart the development server and our pages will be created! An easy way to find new pages you create while developing is to go to a random path where Gatsby will helpfully show you a list of pages on the site. If you go to http://localhost:8000/sdf you’ll see the new pages we created.
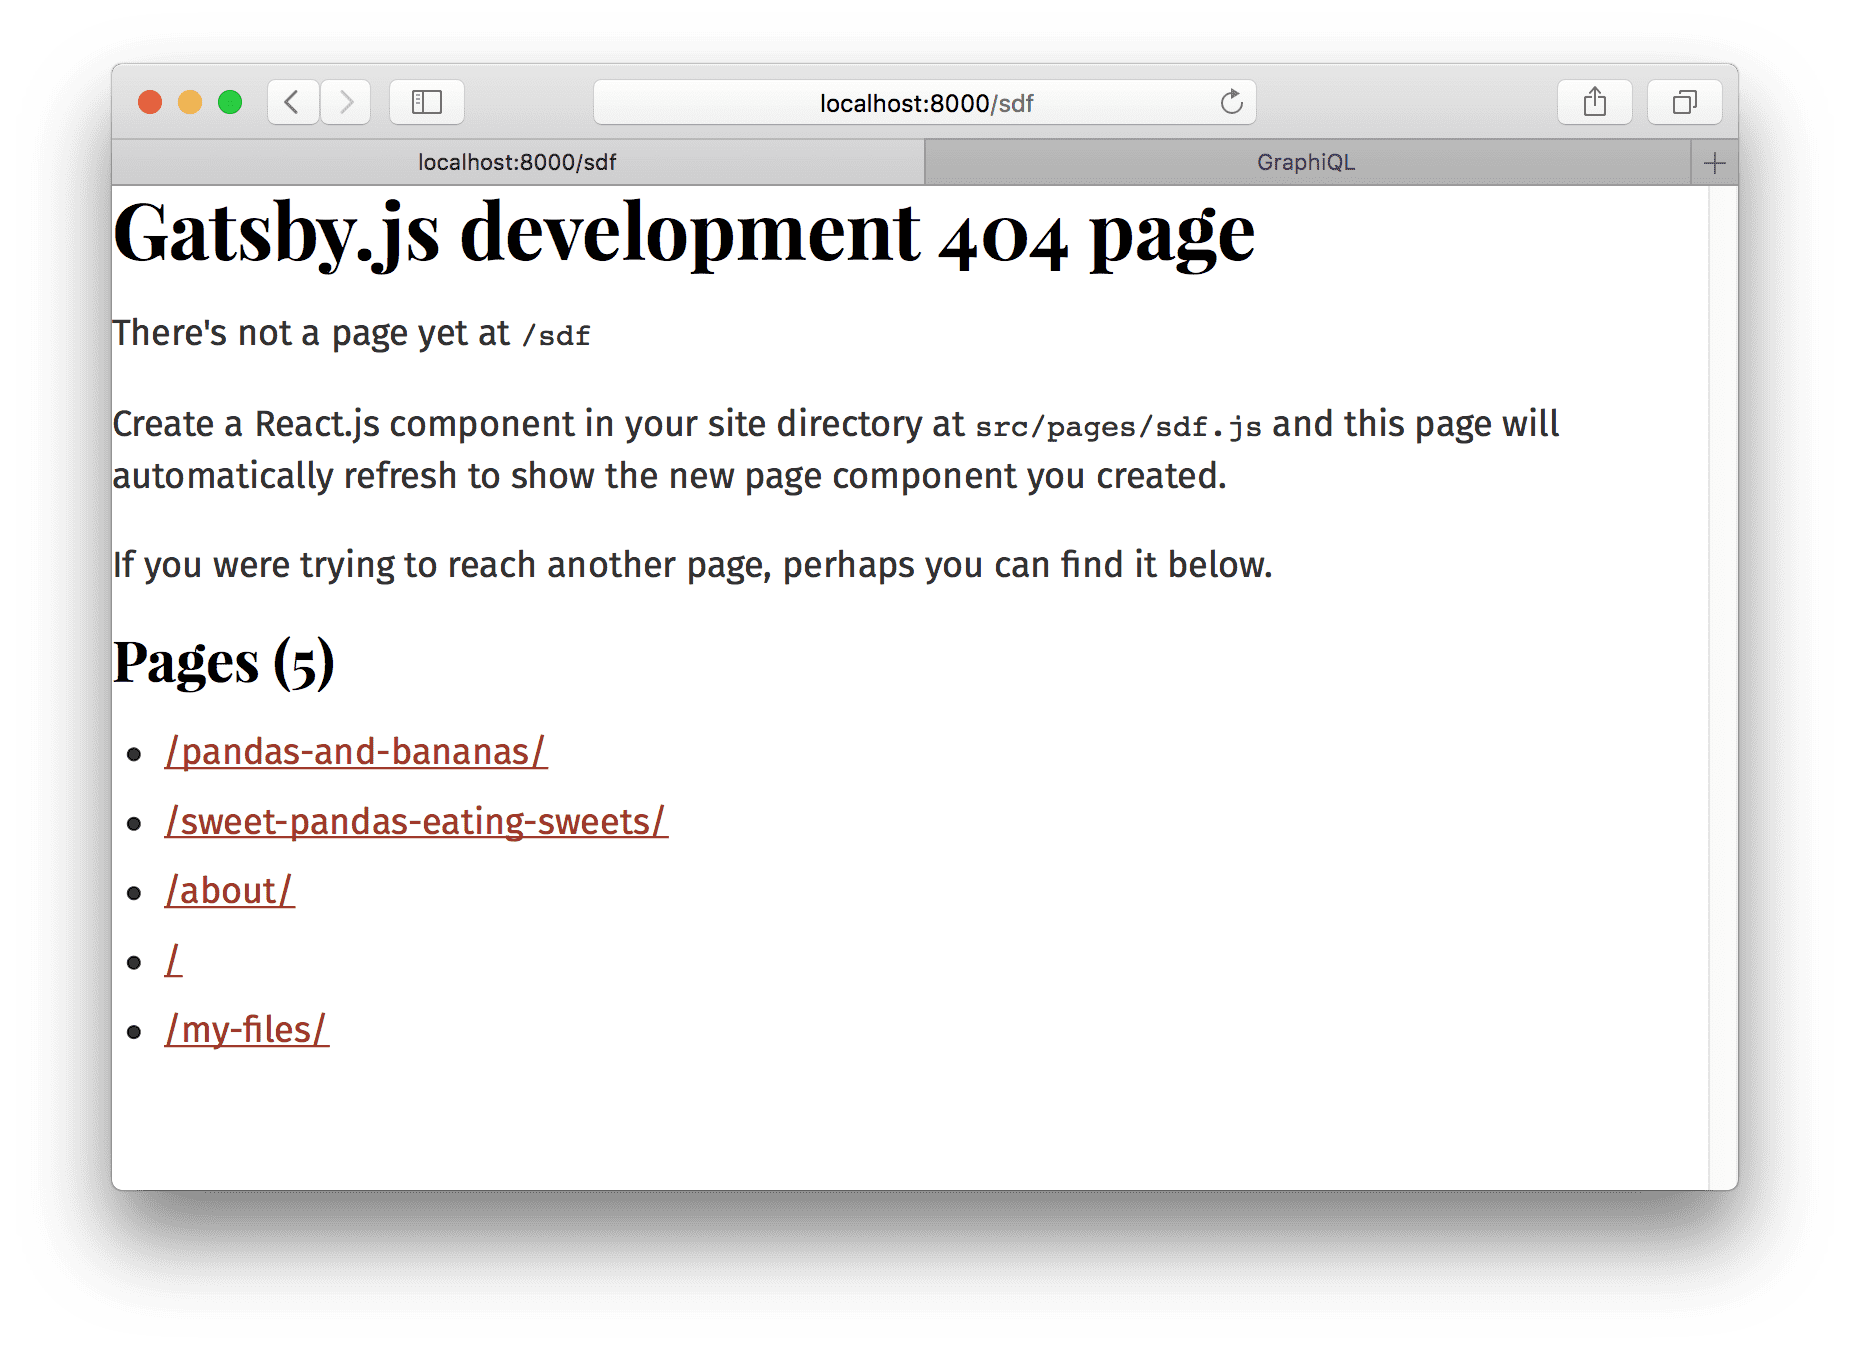
Visit one of them and we see:
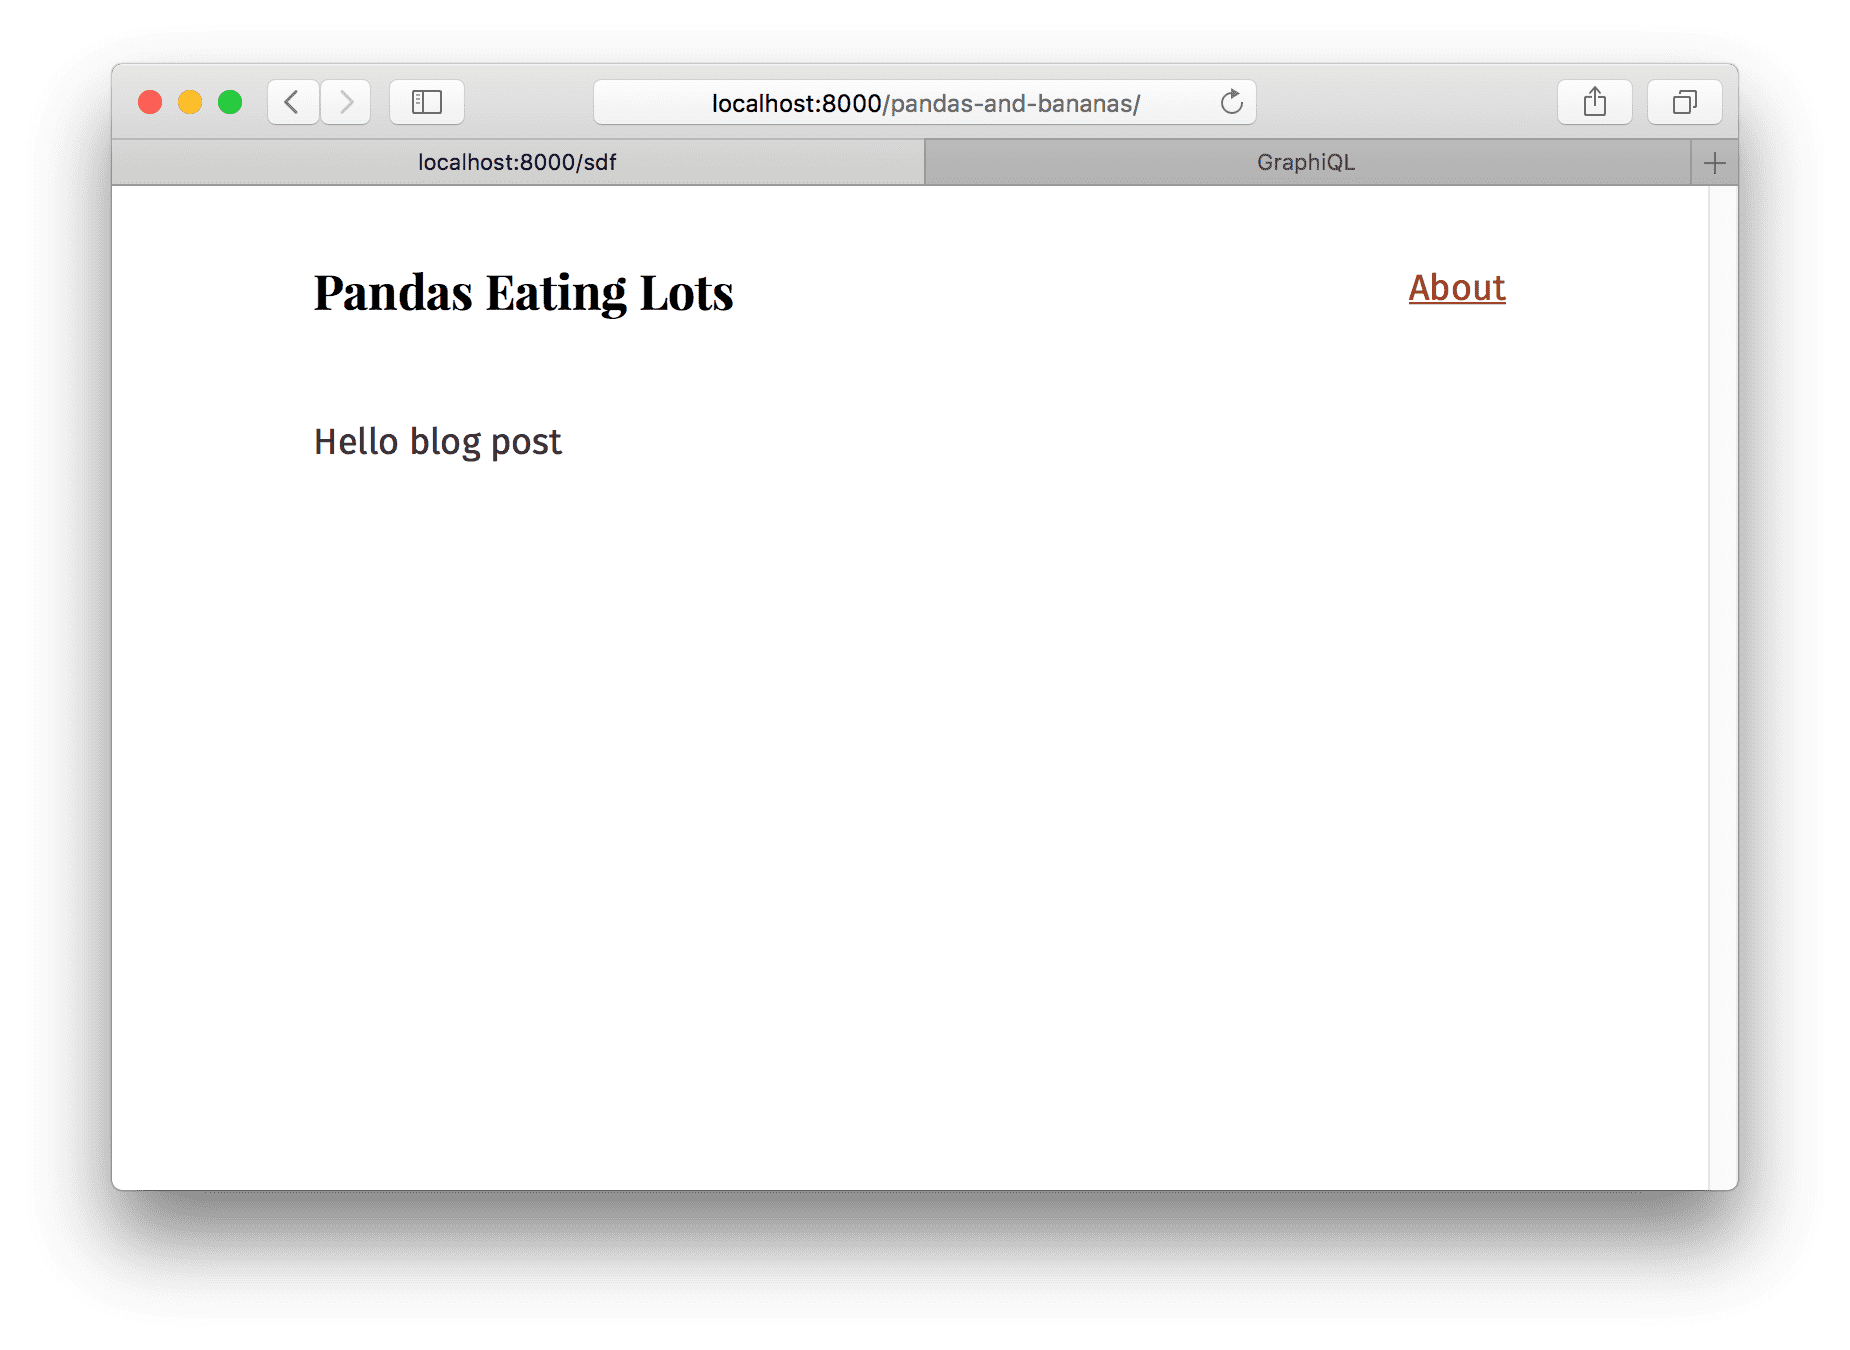
Which is a bit boring. Let’s pull in data from our Markdown post. Change
src/templates/blog-post.js to:
import React from "react";

export default ({ data }) => {
  const post = data.markdownRemark;
  return (
    <div>
      <h1>{post.frontmatter.title}</h1>
      <div dangerouslySetInnerHTML={{ __html: post.html }} />
    </div>
  );
};

export const query = graphql`
  query BlogPostQuery($slug: String!) {
    markdownRemark(fields: { slug: { eq: $slug } }) {
      html
      frontmatter {
        title
      }
    }
  }
`;
And…

Sweet!
The last step is to link to our new pages from the index page.
Return to src/pages/index.js and let’s query for our Markdown slugs and create
links.
import React from "react"
import g from "glamorous"
import Link from "gatsby-link"

import { rhythm } from "../utils/typography"

export default ({ data }) => {
  return (
    <div>
      <g.H1 display={"inline-block"} borderBottom={"1px solid"}>
        Amazing Pandas Eating Things
      </g.H1>
      <h4>
        {data.allMarkdownRemark.totalCount} Posts
      </h4>
      {data.allMarkdownRemark.edges.map(({ node }) =>
        <div key={node.id}>
          <Link
            to={node.fields.slug}
            css={{ textDecoration: `none`, color: `inherit` }}
          >
            <g.H3 marginBottom={rhythm(1 / 4)}>
              {node.frontmatter.title}{" "}
              <g.Span color="#BBB">— {node.frontmatter.date}</g.Span>
            </g.H3>
            <p>
              {node.excerpt}
            </p>
          </Link>
        </div>
      )}
    </div>
  )
}

export const query = graphql`
  query IndexQuery {
    allMarkdownRemark(sort: { fields: [frontmatter___date], order: DESC }) {
      totalCount
      edges {
        node {
          id
          frontmatter {
            title
            date(formatString: "DD MMMM, YYYY")
          }
          fields {
            slug
          }
          excerpt
        }
      }
    }
  }
`
And there we go! A working (albeit quite simple still) blog!
Try playing more with the site. Try adding some more Markdown files. Explore
querying other data from the MarkdownRemark nodes and adding them to the
frontpage or blog posts pages.
In this part of the tutorial, we’ve learned the foundations of building with Gatsby’s data layer. You’ve learned how to source and transform data using plugins. How to use GraphQL to map data to pages. Then how to build page template components where you query for data for each page.


